Subscribe

Showing posts with label ANDROID TIPS/TRICS. Show all posts

Thursday, 22 December 2016

10 Universal Android Tips and Tricks That You Should Know

10 Universal Android Tips and Tricks That You Should Know


I’ll admit that my relationship with Android got off to a rocky start. My first smartphone was a Samsung Galaxy S Continuum, and it was so horrible that I bought an iPhone the instant my contract was up. Though my initial experience with Android was terrible, there’s no question that it’s improved by leaps and bounds over the years. I’ve experienced the awesome side of Google’s mobile OS firsthand in the form of the 2012 Nexus 7 tablet, which I received as a gift soon after its release. Since then, I’ve used it as an e-reader, gaming device, web browser, and more. In the process I’ve discovered a few useful Android related tips and tricks, some of which I’ve listed below!


1. Maintain it like a PC to improve performance.


While Android can do much more than iOS, it requires more horsepower and user finagling to run smoothly. You can’t do much about upgrading your smartphone or tablet’s processor (barring a new purchase), but you can take the time to optimize what you have. Much like a PC, Android devices need to be tuned up now and again. There are several apps that can assist you in this, like All-In-One Toolbox. Even without that app though, you can do stuff like deleting old, unused apps, removing widgets you don’t use, and ending unnecessary processes on your own. To do that last one (the concept of which is much like ending processes through control + alt + delete on a PC), go to settings, apps, running, and manually end anything taking up too much RAM memory.

2. Take advantage Android’s customization potential.


3. Ensure your device gets back to you if you lose it.


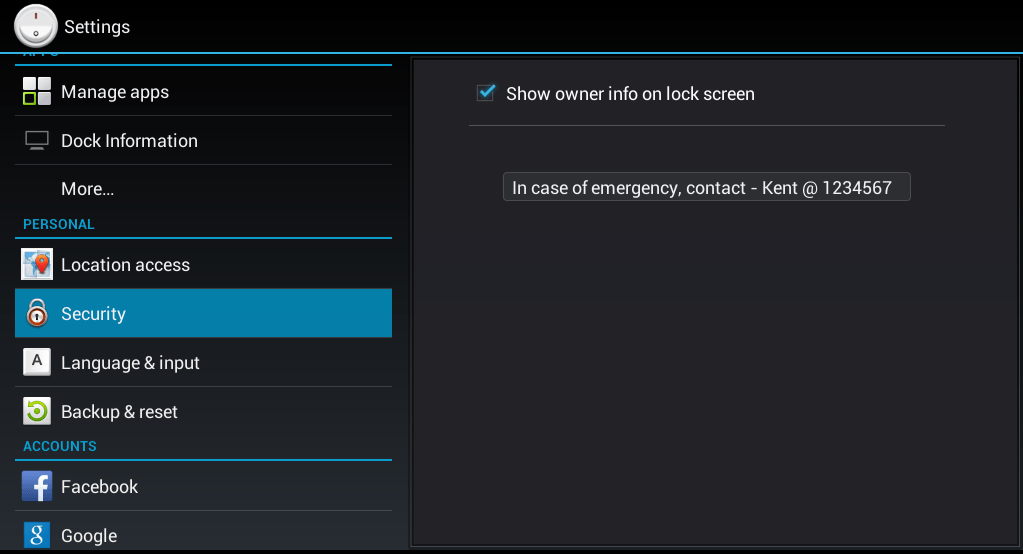
There’s no surefire way to guarantee you’ll ever see your phone or tablet again if you leave it out in public by accident. That being said, you can improve the chances of it being returned to you by editing your security settings. Go to settings, then security, then owner info. There you’ll see a little box where you can type in contact information that will show up on your lockscreen. This will make it easier for a good Samaritan to return a lost device to its rightful owner.

4. Carry around multiple batteries.

This tip isn’t quite as universal as it used to be since many Android manufacturers like HTC are taking a page out of Apple’s book and disallowing you from swapping batteries. Still, this will work if you own a Samsung device, which most Android users have. It’s pretty simple: if you buy multiple batteries, charge them up, and store them in your backpack or briefcase, you can ensure that your phone will never run out of power. All you’ll have to do is take out your battery when it’s dead and swap in a new one. This way, you won’t have to rely on wall sockets, which is useful if you travel a lot.

5. Make your phone harder to break into than Fort Knox.

Reader warning: don’t do this one unless you’re really afraid of your phone’s information being stolen. To permanently encrypt your Android device, go to settings, security, encryption, and tap “Encrypt phone.” You’ll then be required to create a pin, which you’ll enter every time you turn your phone on (in order to decrypt it). This is like the unlock code on an iPhone, except way more drastic. Usually it will take about an hour for your device to encrypt itself, and it can only be undone through a factory reset. Only do this if you have sensitive information, or want your phone to be as secure as humanly possible. Be aware that encrypting your information will slow down how fast you can access it.

6. Test out different launchers.

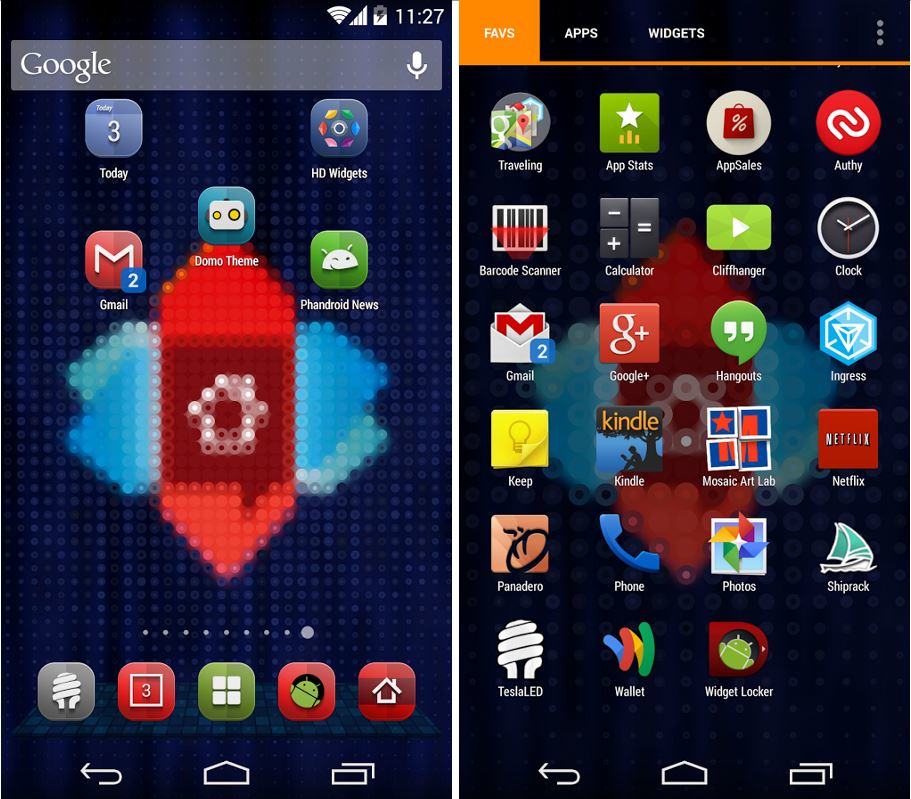
If you have an Android phone, you can use these things called “launchers,” which are essentially apps that allow you to make drasticedits to your device’s homescreen. The most popular one is probably Nova Launcher, which will allow you to change just about everything you can think of. There are several other launchers out there too, and you can play around with them until you find one you like. Often, they can make your phone perform faster than they would with the clunky interfaces that companies like Samsung and HTC give them.

7. Say “Ok, Google” to start a search from any screen.


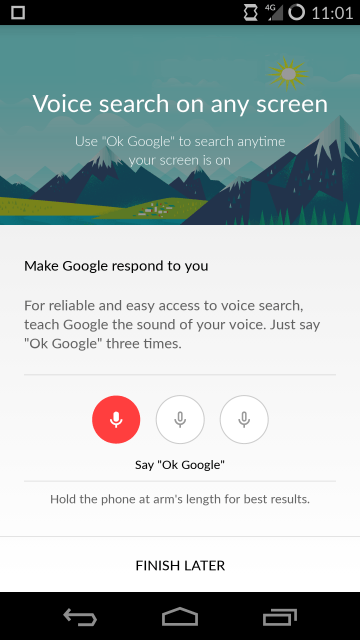
It’s the 21st century and we’re all busy 24/7. Cut down on the time it takes to manually search for things by doing it with your voice. To activate vocal control over Google searches, go to your apps page and find the Google app. Tap it (it should take you to Google Now), and scroll down until you see the settings icon on the bottom right. Hit that and select “Voice.” Then, tap on “Ok Google Detection” and activate the “From any screen” setting. Now you’ll be able to start a Google search from any screen on your phone simply by speaking the phrase, “Ok, Google.”

8. Access the hidden developer options.

To really get a sense of how customizable Android is, activate the “secret” developer mode. Go to settings, about phone, and click on “build number” seven times. Your device should tell you something like “you’re now a developer!” It’s all very Easter Egg-esque. Once that’s done, return to system settings, and with luck you’ll now see something entitled “developer options.” One of the cool things you can do here is reduce the time it takes for animations to execute, thereby making your phone feel snappier. Do this by going to the “animation scale” options and turning them off (you can make them take longer too, but I don’t see why you would want that). There are plenty of other sweet customizations you can do on this page, but don’t go too crazy unless you know what you’re doing.

9. See useful information on your lock screen.

You probably know by now that you can put widgets on your homescreen, but did you know you can do the same for your lockscreen? This means that you won’t have to unlock your phone anymore if all you want is to see some basic information. To do this, go to settings, security, and tap “enable widgets.” Then, go to the lockscreen and swipe left. You should see a big “+” sign. Hit that and you’ll be taken to a screen where you can select widgets to place on your lockscreen. Put anything from your e-mail to Google Now there in order to see stuff like weather, new messages, etc.

10. You aren’t tied to the Google Play store.

OK, well, you sort of are, but you can download other app stores like Amazon’s if you want to. Indeed, I highly suggest you do so because they are always offering insane deals to try and rip you away from Google’s warm embrace. One of these is their “App of the Day,” in which Amazon offers up a free app to entice you to spend more time in their store. If you’re lucky, you’ll be able to save lots of money using these promotions, as at times they’ll put up apps for free that cost several dollars on Google Play.


Sunday, 18 December 2016

How To Remotely Shutdown PC From Anywhere With Smartphon.

How To Remotely Shutdown PC From Anywhere With Smartphon

or smartphone and PC users, we are here with a cool trick for how to remotely shutdown PC from anywhere with the smartphone. Today smartphones are extraordinarily smart that it can be used for many purposes. Till now we had discussed many cool tricks for smartphones and again we are here with a cool method to shut down your Windows PC using a phone. Yes, it is possible and you can implement this and remotely shut down your PC with your mobile from anywhere by just sending a shutdown request to your computer over the internet. So have a look at the complete guide below.

How To Remotely Shutdown Windows PC From Anywhere Using Phone
The method is based on a cool Windows program that is essentially designed to schedule shutdown on your PC, you can also call it remote shutdown program. You need to follow some easy steps to shut down your PC using your smartphone. So, proceed with below steps.

Steps To Shutdown PC With Smartphone Remotely:

Step 1. First of in your Windows PC, download and install the program Airytec switch off.
                  

Step 2. Now install the app and you will see shutdown icon in system tray.


Step 3. Click on the icon and tick the options there according to your need like Force shutdown should be enabled.
                             
Step 4. Now right click on shutdown icon and click on settings and there click on remote section there. Now click on Edit Web interface Settings there.9
                               

Step 5. There enable Web interface and remain the Authentication unchecked and click on apply button.
 

Step 6. Now click on view / update static addresses and note down the Shutdown URL  there and for the easy interface, you can bookmark this URL in Your Mobile. Now double click on shutdown icon in system tray and enable task.


Step 7. Now open the URL in your mobile and you will see the interface like below. 
                            
  Step 8. Now you can click on shutdown button to shut down your computer.
 
That’s it! you are done. By using this, now you can easily shutdown your computer from anywhere using your phone.


Saturday, 17 December 2016

How to bypass Android’s lock screen pattern, PIN or password


How to bypass Android’s lock screen pattern, PIN or password


The main reason to set up some sort of lock screen security on your smartphone is to keep strangers (or friends) from checking out your messages or private pictures. Beyond that, you don’t want anyone who dares to steal your phone to get full access to your mails, pictures or other sensitive data. But what if you’re the one who cannot access your phone? You could forget your PIN or pattern, right? Or someone pranks you by setting up a lock screen pattern and just leaves you struggling with it.In any case, there’s quite an easy solution to this without smashing your phone against a wall (or your friend’s face). The only thing you need is to have Android Device Manager enabled on your device (before you locked yourself out of your phone). If you have a Samsung phone, you can also unlock your phone using your Samsung account.

Forgot your Android lock screen pattern, PIN or password? Here’s what to do

I tested the following methods using a lock screen pattern, PIN and password and was able to unlock my LG G2 with Android 4.4.2 successfully.

Unlock your Android device using Android Device Manager (ADM)

As already mentioned, the following method only applies to devices that have Android Device Manager enabled.
  1. On a computer or other mobile phone, visit: google.com/android/devicemanager
  2. Sign in using your Google login details that you also used on your locked phone.
  3. In the ADM interface, select the device you need to unlock (if it isn’t already selected).
  4. Select ‘Lock’
  5. In the appearing window, enter a temporary password. You don’t have to enter a recovery message. Now click ‘Lock’ again.
  6. If it was successful, you should see a confirmation below the box with the buttons Ring, Lock and Erase.
  7. On your phone you should now see a password field in which you should enter the temporary password. This should unlock your phone.
  8. Now, before you go on with your life, go to your phone’s lock screen settings and disable the temporary password.
That’s it!  

Unlock your Android lock screen pattern with your Google Login (only Android 4.4 and below)

echo adrotate_ad(5, true, 0, 0);
If you haven’t updated your firmware to Android Lollipop (5.0), then there’s a faster way to unlock a lock screen pattern.

  1. Enter a wrong lock screen pattern five times (shouldn’t be hard if you don’t remember the correct one)
  2. Select ‘Forgot Pattern’
  3. Now you should be able to enter a backup PIN or your Google account login.
  4. Enter either your backup PIN or your Google login.
  5. Your phone should now be unlocked.


Bypass your Samsung phone’s lock screen using its Find My Mobile tool

This is an easy way to unlock your Samsung device if you created a Samsung account and registered it beforehand.

  1. Go to Samsung Find My Mobile.
  2. Sign in using your Samsung login details.
  3. In the Find My Mobile account interface you should see your registered phone on the left hand side. This tells you that you’re phone is registered to that account.
  4. On the left sidebar, select ‘Unlock my screen’.
  5. Now select ‘Unlock’ and wait for a few seconds for the process to finish.
  6. You should get a notification window telling you that your screen is unlocked.
  7. That’s it. Your phone should be unlocked.

Disable your lock screen using custom recovery and “Pattern Password Disable” (SD card needed)

This method is for more advanced Android users that know what the terms “rooting” and “custom recovery” mean. As the title says, for this to work you need any kind of custom recovery installed and your phone must have an SD card slot. Why the SD card? Well, we need to transfer a ZIP file to your phone and that’s usually not possible when it’s locked. The only way is to insert an SD card with the file.Unfortunately, card slots became kind of a rare thing in the smartphone world, so this will only work for some people.
Here’s what you need to do:
  1. Download the Pattern Password Disable ZIP file on your computer and put it on an SD card.
  2. Insert the SD card into your phone.
  3. Reboot your phone into recovery.
  4. Flash the ZIP file on your SD card.
  5. Reboot.
  6. Your phone should boot up without a locked screen. Should there be a password or gesture lock screen, don’t panic. Just type in a random password or gesture and your phone should unlock.

  1. Call your locked phone from another one.
  2. Accept the call and hit the back button during the call
  3. This should give you complete access to your phone
  4. Go to your phone’s security settings and try to remove the pin or pattern. To do so, you first need to put in the current one, which you obviously don’t know anymore. The only way is to guess and try out different combinations until you get it right. Should you get this far, then you can disable the pin or set a new one.

Erase your phone (and lock screen) using Android Device Manager

If all the methods above didn’t work out, you need to move on to more drastic measures. In case Android Device Manager is enabled on your phone and unlocking it didn’t work, you can use it to erase all data by selecting the Erase button. Be aware that this will delete all apps, settings and other data on your phone. The good thing is, once the erasing process is done, you can use your phone again (after setting everything up).

Reset your phone to factory settings

If Android Device Manager doesn’t work at all for you, your last resort is to make a factory reset on your device. On Nexus devices, this can be done in recovery mode, for example. Below, we take you through the reset process that work with Nexus devices. If you own a different Android phone, check out this site and look for your manufacturer’s support page.

How to perform a factory reset on your Nexus using recovery mode:

Important note: If your Nexus device is running Android 5.1 or higher, you’re required to enter a Google username and password associated with your device after the factory reset process finishes. This is a security measure to make sure that no stranger is reseting your phone or tablet. If you fail to enter that data, the phone won’t be usable anymore. Really make sure you know your Googel username and password.
No matter what version of Android you’re running, you need to have an internet connectionand if you just changed your Google account password, you need to wait at least 72 hoursbefore starting the reset process.
  1. Turn off your device.
  2. Press the volume down AND power button and keep pressing them. Your device will start up and boot into the bootloader (you should see “Start” and an Android lying on its back).
  3. Press the volume down button to go through the different options until you see “Recovery Mode” (pressing volume down twice). Now press the power button to enter recovery mode.
  4. You should see an Android on its back and a red exclamation mark.
  5. Press and hold the power button, then press and release the volume up button. Now you should see “Android Recovery” written on the top together with some options.
  6. By pressing the volume down button, go down the options until “Wipe data/factory reset” is selected. Press the power button to select this option.
  7. Using the volume down button again, go down until “Yes – erase all user data” is selected. Make sure you read through the notes above and then, finally, press the power button to start the reset process.
  8. Once the process is done, press the power button to select the reboot option. Your device will now reboot and start the inital setup process of your device. That’s it! All you need to do now is to set up everything and restore your data.
You can also check out Google’s official page and follow the instructions there.
As already mentioned earlier, be aware that reseting or erasing your device will delete all data like apps, settings, videos and pictures.


Subscribe to our Newsletter

Contact our Support

Email us: arshadblog199@gmail.com